How to Do the Clam Shell Exercise to Fire Up Your Side-Butt
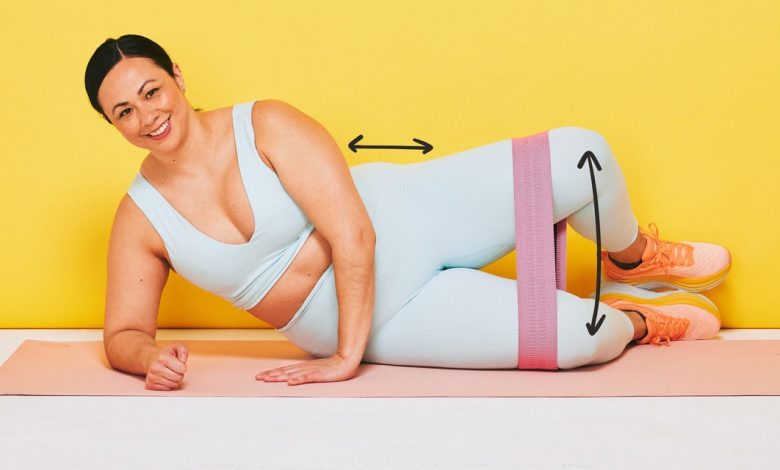
Anyone who spends a lot of the day sitting could probably stand to strengthen their glutes. And the clam shell exercise is an excellent way to do just that.
But it also offers a whole lot more. This exercise—which is a staple in rehab and prehab physical therapy programs, as well as a fixture in some Pilates classes—ushers in a host of total-body benefits that go beyond the butt. Think: Injury prevention, reduced pain, and overall better movement.
In case you’re not familiar, the clam shell involves lying on your side with your hips, knees, and ankles stacked on top of each other and knees bent to a 90-degree angle. Then, keeping your feet pressed together, you simply lift and then lower your top leg, performing a motion called hip abduction (basically, using your hip muscles to move your leg away from your body.) Watch a demo and you’ll understand where it gets its name: The exercise mimics the motion of its namesake sea creature.
The clam shell is simple, yes, but its benefits are seriously legit. Here, we cover all you need to know about this super-effective move, including which muscles it works, what type of exercise it counts as, what you’ll gain by doing it on the reg, form errors to avoid, and tips for weaving it into your routine. Then, we have a GIF and step-by-step instructions so you can try out the clam shell for yourself!
What muscles does the clam shell work?
Do enough reps of the clam shell and you’ll feel your gluteal muscles put to work. Specifically, this exercise really fires up your gluteus maximus (your biggest butt muscle) as well as your gluteus medius, a smaller muscle that forms your side butt, Femi Betiku, PT, DPT, CSCS, a physical therapist and Pilates instructor in Westchester, New York, tells SELF.
It also engages your tensor fasciae latae (TFL), one of the hip flexors, as well as your external obliques, core muscles that run along the sides of your torso, he adds. These two muscles get especially fired up if you use some type of resistance to complete the move—people most commonly do it with a mini-band placed above their knees—since that requires your body to work extra hard to help stabilize your trunk as you complete the clam shell motion.
What kind of exercise is the clam shell?
What box the clam shell ticks depends on your current activity level. If you’re new to exercise, it can be a muscular strength and endurance move, Dr. Betiku says. In other words, it can help your muscles get stronger and boost their ability to work for long periods of time. But if you’re already pretty active, then it’s more of a warm-up drill that can help engage your muscles before you use them more intensely during a workout. That’s because the glutes are one of the strongest muscles in the body, and in order to grow and strengthen them, you need resistance that’s heavy enough to really challenge them. Depending on your current strength level, a band may do this initially, but sooner or later, it won’t be up to snuff.
The clamshell is also commonly used in the rehab and prehab world, meaning it’s prescribed to help people recover from pain and injury, as well as prevent those issues in the first place (more on that below!).
One thing the clam shell definitely isn’t is a mobility exercise. Yes, it involves moving your glute muscles through a range of motion, which may possibly boost mobility there, but that’s not the main idea of the exercise. Instead, think of that as “just an added benefit,” Dr. Betiku explains.
What are the benefits of the clam shell?
By incorporating clam shells into your routine, you can bolster the strength of your glutes, get them ready to work, and reduce your chances of aches, niggles, and issues in a whole bunch of areas.
Here’s why: The gen population generally has weak glutes, thanks to spending a lot of time sitting, Dr. Betiku says. That’s a problem, since this powerhouse muscle group is designed to support a bunch of other areas of the body—including your lower back, hips, and knees, Dr. Betiku explains. So when their strength isn’t up to snuff, you can have pain and injuries in all those surrounding regions, since they’re not getting the support they need. This is why the clam shell is ubiquitous in rehab and rehab settings. It’s effective for both preventing and alleviating a host of issues throughout the body, whether that’s knee pain that flares up with running or lower back pain that’s triggered by toting your child’s car seat.
The banded version of the clam shell also hits your external obliques, which kick on when you complete rotational movements, like running, walking, playing sports or even everyday life tasks like picking up and carrying a heavy bag of groceries. When the external obliques (plus other core muscles) aren’t strong enough for these tasks, your lower back can start to compensate, Dr. Betiku explains. That can lead to back pain, providing yet another example of how the clam shell can really come in clutch.
Long story short: Doing clam shells on the reg can help lower your injury risk and generally just make you a better mover—both in and out of the gym.
What are some mistakes people make with the clam shell?
The clam shell may seem like a simple exercise—and in a lot of ways, it is—but it’s not foolproof. The biggest form error, according to Dr. Betiku, is using other body parts to complete the movement instead of allowing the glutes to be the stars of the show. This makes the exercise not as effective.
When done correctly, the only thing that should be moving is your top knee and top hip—everything above the waist and below the knee should be still, Dr. Betiku says. If you struggle with this, try doing the move alongside a wall: Press your head, upper back, lower back, and heels against it and perform the move from there. “The only thing that’s protruding away from the wall is your knee,” Dr. Betiku says. As you move your top knee up and down, keep everything pressed against the wall. This will ensure your glutes take charge.
How should you include clam shells in your workout routine?
This is another one that depends on your current activity level. If you’re new to exercise, do it with no equipment (use just your bodyweight) to start, aiming for 3 sets of 10 reps, Dr. Betiku says. If propping yourself up onto your forearm, like the below GIF shows, feels too challenging, rest your head on your bottom arm or a pillow. You can weave the clam shell into whatever workout you have planned, slotting it alongside other strengthening exercises, and repeat it as often as every other day.
Folks who are already active can do it with a light resistance band (place it just above your knees) and again, complete 3 sets of 10 reps. In this scenario, the move works great as a warm-up activation drill before a workout, Dr. Betiku says—like this four-move lower-body dumbbell routine, for example.
How to do the clam shell exercise:
Katie Thompson
- Lie on your right side with your hips, knees, and ankles stacked on top of each other. Bend your knees to 90 degrees and wrap the band around your thighs just above your knees. Rest your top hand on the ground. This is the starting position.
- Keeping your feet together, lift your left knee open, then slowly lower it back to meet your left. This is 1 repetition.
- Focus on keeping your core engaged and your back straight as you do these moves. Try not to lean forward or tip back.
- Do all your reps, then switch sides and repeat.
If the OG clam shell feels easy, try this more advanced version:
Katie Thompson
- Prop your body up on your right arm, with your elbow stacked underneath your shoulder and your hand in front of your body.
- Stack your left leg and foot on top of your right, and bend your knees to form a 45-degree angle. Place your left hand on your hip. This is the starting position.
- Drive through your knees and left forearm to lift your hips off the ground. As you do, lift your left knee up toward the ceiling, keeping your feet touching. Use your glutes to initiate the movement, and squeeze them as you lift.
- Lower your left leg back to meet the right. At the same time, lower your hips back to starting position. This is 1 rep.
- Complete 10 reps per side, then switch sides.
In this advanced variation of the move, you’ll work your glutes as well as your shoulder stabilizing muscles. Plus, you’ll fire up your hips and obliques on the side of the body that’s moving as well as the side that’s holding still. Make it harder by lifting your top hip up, holding it still and moving just your top knee.
Demoing the moves above are Amanda Ting (GIF 1), DPT, CSCS, a personal trainer at Mark Fisher Fitness in NYC and Morit Summers (GIF 2), a Brooklyn-based trainer and the owner of body-positive gym, Form Fitness Brooklyn
Related:
- The 21 Best Butt Exercises Top Trainers Swear By
- What the Hell Is a ‘Butt Wink’—And Is It Really All That Bad?
- How to Do the Wall Sit Exercise to Completely Light Up Your Quads
Get more of SELF’s great fitness coverage delivered right to your inbox—for free.
